PowerHA 7.1.3 – HTML report

Recently, I installed a IBM PowerHA SystemMirror 7.1.3.4 in Informix 12.1 environment.

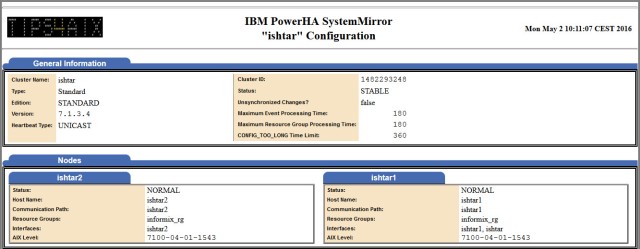
IBM PowerHA 7.1.3 has a very nice feature; the native HTML report.

We can get this report via clmgr command, and no external requirements is needed, simply having the software base installed.

This HTML report contains very useful information from the cluster:

  • General Information about the cluster.
  • Nodes configuration.
  • Resource Groups and Application Controllers.
  • Network Configuration (IP Labels, Interfaces…).
  • Shared LVM components.

We can use the HTML report as great summary of our IBM PowerHA cluster!!

To create the HTML report with clmgr command:

# clmgr view report cluster TYPE=html FILE=/tmp/powerha.report

 A sample cluster clmgr HTML report:

PowerHA

Resource Groups

PowerHA_3

Network configuration:

PowerHA_2

Enjoy it!

Posted in Sin categoría | 2 Comments

Route problem determination

Sometimes we have problems to reach remote systems due to a misconfiguration of the default gateway or static routes:

How to check the AIX Ethernet adapter and gateway used to reach the remote system?

For example, my LPAR has the following network configuration:

lpar_aix(root):/>ifconfig -a
Management Network
en4: flags=5e080863,c0<UP,BROADCAST,NOTRAILERS,RUNNING,SIMPLEX,MULTICAST,GROUPRT,64BIT,CHECKSUM_OFFLOAD(ACTIVE),PSEG,LARGESEND,CHAIN>
        inet 192.168.198.128 netmask 0xffffff00 broadcast 192.168.198.255
         tcp_sendspace 131072 tcp_recvspace 65536 rfc1323 0
Backup Network
en6: flags=1e080863,c0<UP,BROADCAST,NOTRAILERS,RUNNING,SIMPLEX,MULTICAST,GROUPRT,64BIT,CHECKSUM_OFFLOAD(ACTIVE),LARGESEND,CHAIN>
        inet 192.168.197.13 netmask 0xffffff00 broadcast 192.168.197.255
         tcp_sendspace 131072 tcp_recvspace 65536 rfc1323 0
lo0: flags=e08084b<UP,BROADCAST,LOOPBACK,RUNNING,SIMPLEX,MULTICAST,GROUPRT,64BIT>
        inet 127.0.0.1 netmask 0xff000000 broadcast 127.255.255.255
        inet6 ::1/0
         tcp_sendspace 131072 tcp_recvspace 131072 rfc1323 1

The target production host has the following network configuration:

  • Production Network            192.168.125.148
  • Management Network        192.168.198.138
  • Backup Network                   192.168.197.22

What is the network interface that will use our LPAR to reach the Production Network 192.168.125.148?

lpar_aix(root):/>route get 192.168.125.148    
   route to: lpar_prod.intranet.lab.es
destination: default
       mask: default
    gateway: 192.168.198.13            <-- Gateway used to reach the 192.168.125.148 host
  interface: en4                       <-- Ethernet Adapter used to reach the network 192.168.125.xxx
interf addr: lpar_aix.intranet.lab.es        
      flags: <UP,GATEWAY,DONE>
 recvpipe  sendpipe  ssthresh  rtt,msec    rttvar  hopcount      mtu     expire
       0         0         0         0         0         0         0        52

What is the network interface that will use our LPAR to reach the Management Network 192.168.198.138?

lpar_aix(root):/>route get 192.168.198.138
   route to: lpar_prod_manag.intranet.lab.es
destination: 192.168.198.0             <-- The source and destination IP are on the same network
       mask: 255.255.255.0             <-- Subnet Mask of the network
  interface: en4                       <-- Ethernet Adapter used to reach the network 192.168.198.xxx
interf addr: lpar_aix.intranet.lab.es
      flags: <UP,DONE>
 recvpipe  sendpipe  ssthresh  rtt,msec    rttvar  hopcount      mtu     expire
       0         0         0       438       375         0         0        60

Note: Pay attention to the “gateway” field does not appear, since the EN4 interface is in the same network as the IP destination to reach.

What is the network interface that will use our LPAR to reach the Backup Network 192.168.197.22?

lpar_aix(root):/>route get 192.168.197.22
   route to: lpar_prod_bck.intranet.lab.es
destination: 192.168.197.0             <-- The source and destination IP are on the same network
       mask: 255.255.255.0             <-- Subnet Mask of the network
  interface: en6                       <-- Ethernet Adapter used to reach the network 192.168.197.xxx
interf addr: lpar_aix_bck.intranet.lab.es
      flags: <UP,DONE>
 recvpipe  sendpipe  ssthresh  rtt,msec    rttvar  hopcount      mtu     expire
       0         0         0       438       375         0         0        60

Note: Pay attention to the “gateway” field does not appear, since the EN6 interface is in the same network as the IP destination to reach.

I hope you like it!
Posted in Sin categoría | 2 Comments

Unix Shell – Loop Examples

The while / for loops allows you to execute certain task and commands repeatedly, for example, to list information or change attributes of the AIX devices.

Syntax

The syntax is as follows:

While loop
while [ condition ]
do
  command
done 

For loop
for {variable} in {lists}
do
  command
done

Examples

Here are several examples that uses the while / for loop to display the size of the first 7 hdisks:

Example 1 - While loop
X=0
while ((X<=7))
do
  echo "hdisk$X\t\c"
  bootinfo -s hdisk$X
  ((X=$X+1))
done

Example 2 - For loop (with perl)
for X in `perl -e 'print join(" ", 0..7)'`
do 
  echo "hdisk$X\t\c"
  bootinfo -s hdisk$X
done

Example 3 - For loop (basic)
for X in 0 1 2 3 4 5 6 7
do
  echo "hdisk$X\t\c"
  bootinfo -s hdisk$X
done

I hope your comments!

Posted in Sin categoría | Leave a comment

LVM summary log

To track and find the LVM changes in our AIX server, read the lvmcfg.log log:

cat /var/adm/ras/lvmcfg.log

Or  run the ‘alog’ command to view directly the AIX log:

alog -o -t lvmcf

Example:

lpar_aix:root:/tmp> alog -o -t lvmcfg
[S 8192158 25100396 07/14/15-15:51:59:335 mkvg.c 415] extendvg -f -p None datavg hdisk12 hdisk13 hdisk14 hdisk15
[E 8192158 0:151 mkvg.c 271] extendvg: exited with rc=0
[S 8192160 25100398 07/14/15-15:51:59:509 chvg.sh 1097] chvg -Qn datavg
[E 8192160 0:185 chvg.sh 23] chvg: exited with rc=0
[S 8192186 25100422 07/14/15-15:52:01:138 mklvcopy.c 236] mklvcopy -m /tmp/laaoy47al int11_lv13 2
[E 8192186 0:245 mklvcopy.c 1797] mklvcopy: exited with rc=0
[S 25559052 24510596 10/12/15-09:31:53:963 extendlv.sh 789] extendlv hd9var 1
[E 25559052 0:700 extendlv.sh 33] extendlv: exited with rc=0

The lvmcfg.log contains the following information:

  • 10/12/15-09:31:53:963 = Timestamp of the executed command.
  • extendlv hd9var 1 = Command executed.
  • S / E = Start entry / End entry.
  • 25559052 = Process ID (pid).
  • 24510596 = Parent PID (ppid).
  • 0:700 = Time elapsed since start entry in seconds:milliseconds (s:ms).
  • extendlv.sh = Script writing to log.
  • exited with rc=0 = Return Code of command.

I hope your comments!

Posted in Sin categoría | Leave a comment

Discover Cisco switch information with tcpdump

Recently, I discovered how to get the port and the network switch my AIX server is connected to. You will be thinking: “we can review it physically in the Datacenter…”, but I will explain you how to do it with a remote session! Is not it amazing?

To accomplish this, we must use the tcpdump command.

In the example, we will investigate the en11 interface:

# tcpdump -nn -v -i en11 -s 1500 -c 1 'ether[20:2] == 0x2000'
tcpdump: listening on en11, link-type 1, capture size 1500 bytes
09:20:16.668992 CDP v2, ttl: 180s, checksum: 692 (unverified)
        Device-ID (0x01), length: 6 bytes: 'swjc02'
        Version String (0x05), length: 247 bytes:
        Cisco IOS Software, C2960X Software (C2960X-UNIVERSALK9-M), Version 15.0(2)EX5, RELEASE SOFTWARE (fc1)
        Technical Support: http://www.cisco.com/techsupport
        Copyright (c) 1986-2014 by Cisco Systems, Inc.
        Compiled Fri 21-Feb-14 05:54 by prod_rel_team
        Platform (0x06), length: 23 bytes: 'cisco WS-C2960X-48TS-LL'
        Address (0x02), length: 13 bytes: IPv4 (1) 10.1.5.241
        Port-ID (0x03), length: 19 bytes: 'GigabitEthernet0/15'
        Capability (0x04), length: 4 bytes: (0x00000028): L2 Switch, IGMP snooping
        Protocol-Hello option (0x08), length: 32 bytes:
        VTP Management Domain (0x09), length: 0 byte: ''
340 packets received by filter
0 packets dropped by kernel

From this information we know:

  • Switch device name is ‘swjc02‘.
  • The type/model of the switch is ‘cisco WS-C2960X-48TS-LL‘.
  • And the IP address is ‘10.1.5.241‘.
  • The en11 interface is connected to ‘GigabitEthernet0/15‘ (switch port number 15).

Limitations of this trick:

  • Only works with Cisco switch (use the Cisco Discovery Protocol – CDP).
  • It doesn’t work with virtual Ethernet adapters (LPARs). Execute the ‘tcpdump’ command only on physical interfaces (eg VIOS), instead.
  • It doesn’t work on etherchannels with multiple active adapters.

Please, use the form for comments, questions or any other feedback. Thanks!

Posted in Sin categoría | Leave a comment

Checking queue_depth attribute with kdb

When we change the queue_depth attribute on a hdisks with the chdev –P command, it updates the devices database ODM information only, but not its current configuration.

Obtained from the website of IBM:

-P –> Changes the device’s characteristics permanently in the Customized Devices object class without actually changing the device.

http://www-01.ibm.com/support/knowledgecenter/ssw_aix_71/com.ibm.aix.cmds1/chdev.htm

But… how to check if the ODM queue_depth matches the current running configuration?

In our example, we have a hdisk1 with a queue_depth of 3:

1. Check the queue_depth value with the lsattr command (ODM):

# lsattr -El hdisk1 -a queue_depth
  queue_depth 3 Queue DEPTH True

2. Check the queue_depth value with the kdb command (current configuration):

# echo scsidisk hdisk1 | kdb | grep queue_depth
    ushort queue_depth  = 0x3;    <-- Hexadecimal value

3. We change the queue_depth using chdev –P (this update ODM only!!):

# chdev -l hdisk1 -a queue_depth=256 -P
  hdisk1 changed

# lsattr -El hdisk1 -a queue_depth
  queue_depth 256 Queue DEPTH True

4.  But kdb (queries to the kernel) reports that the hdisk1 running configuration still has a queue_depth of 3.

# echo scsidisk hdisk1 | kdb | grep queue_depth
ushort queue_depth  = 0x3;

Now, we will have a different queue_depth value in the ODM database compared to the current running config (value in the kernel).

To apply the new queue_depth attribute value:

  • varyoffvg the Volume Group, change the queue_depth without ‘chdev -P‘ flag and varyonvg the Volume Group.
  • Reboot the operating system (yes… it is not easy in a production environment).

As an example:

# umount /backup
# varyoffvg backupvg

# chdev -l hdisk1 -a queue_depth=256
hdisk1 changed

# varyonvg backupvg
# mount /backup

# lsattr -El hdisk1 -a queue_depth <-- Decimal ODM value = 256
queue_depth 256 Queue DEPTH True

# echo scsidisk hdisk1 | kdb | grep queue_depth
  ushort queue_depth  = 0x100;     <-- Hexadecimal Kernel value = 256

kdb kernel queries works on AIX 6.1 and 7.1 operating systems only (not work on AIX 5.3 or older systems!!!).

Leave your questions and comments!

Posted in Sin categoría | Leave a comment

Creating virtual optical device on VIOS

This is a great feature that allows us to create and map virtual optical devices from the VIO Server to LPAR Client for installations of AIX, updates to a new Technology Level / Service Pack or make backups.

First step is to check if a repository exists on our VIOS:

padmin@VIO1:/home/padmin> lsrep
 The DVD repository has not been created yet.

For create a repository, run as padmin user:

padmin@VIO1:/home/padmin> mkrep -sp rootvg -size 30G
 Virtual Media Repository Created

Note: This basically will create a 30GB repository which is a new logical volume called VMLibrary_LV in the rootvg Volume Group.

Check the VMLibrary repository:

padmin@VIO1:/home/padmin> df /var/vio/VMLibrary
Filesystem        512-blocks Free      %Used Iused %Iused  Mounted on
/dev/VMLibrary_LV 33554432   33417600  1%     4    1%      /var/vio/VMLibrary

Copy your .iso files to the VMLibrary repository:

1. Can be created from CD / DVD:

padmin@VIO1:/home/padmin> mkvopt -name AIX6_DVD1 -dev cd0 -ro
padmin@VIO1:/home/padmin> mkvopt -name AIX6_DVD2 -dev cd0 -ro

2. Or copy the local ISO image to repository:

padmin@VIO1:/home/padmin> mkvopt -name AIX6_DVD1 -file /tmp/aix6_dvd1.iso -ro
padmin@VIO1:/home/padmin> mkvopt -name AIX6_DVD2 -file /tmp/aix6_dvd2.iso -ro

After the .iso files are in your /var/vio/VMLibrary directory, run:

padmin@VIO1:/home/padmin> mkvdev -fbo -vadapter vhost0 
vtopt0 Available

Note: This command create and map a virtual optical device called vtopt0 (FBO target => file-backed optical device) in the vhost0 adapter.

Now, run ‘loadopt’ command and load your DVD image in the virtual CD device:

padmin@VIO1:/home/padmin> loadopt -vtd vtopt0 -disk AIX6_DVD1

Run ‘lsmap’ on the vadapter you’d assigned to your vtopt0 device:

padmin@VIO1:/home/padmin> lsmap -vadapter vhost0 
SVSA            Physloc Client                  Partition ID 
---------------------------------------------------------- 
vhost0          U9131.52A.0650CDB-V3-C11        0x00000000 
VTD             vtopt0 
Status          Available 
LUN             0x8100000000000000 
Backing device  /var/vio/VMLibrary/AIX6_DVD1 
Physloc

From here, boot the LPAR partition in SMS mode, and we can install de AIX 6.1 operating system from this virtual CD as if it were a physical CD / DVD.

When the first DVD installation finished, remove DVD1.

padmin@VIO1:/home/padmin> unloadopt -vtd vtopt0

Then we load DVD2 in the virtual optical device:

padmin@VIO1:/home/padmin> loadopt -vtd vtopt0 -disk AIX6_DVD2

Important: If the CD device is locked by the client, use the -release flag to remove the reserve, and ran again the commandloadopt”:

padmin@VIO1:/home/padmin> unloadopt -vtd vtopt0
 Unable to perform the requested operation.
 'vtopt0' is currently reserved by the client.

padmin@VIO1:/home/padmin> unloadopt -vtd vtopt0 -release

padmin@VIO1:/home/padmin> loadopt -vtd vtopt0 -disk AIX6_DVD2
Posted in Sin categoría | Leave a comment

How check VSCSI and NPIV adapter mapping

Check VSCSI adapter mapping

With the next command, we can find out which VHOST is mapped to which VSCSI in the VIOS level (show vscsi <–> vhost mappings).

Run on LPAR Client (not on VIO Server):

root@AIX: / # echo "cvai" | kdb | grep vscsi
 vscsi0 0x000007 0x0000000001 0x0 VIO5->vhost1
 vscsi1 0x000007 0x0000000003 0x0 VIO6->vhost1

Check NPIV adapter mapping

To check the connection between your VFCHOST and FC physical port in the VIOS level (show vfchost <–> fcs mappings).

Run on LPAR Client (not on VIO Server):

root@AIX: / # echo "vfcs" | kdb
 NAME ADDRESS STATE HOST HOST_ADAP OPENED NUM_ACTIVE
 fcs0 0xF1000A000033C123 0x0008 VIO1 vfchost2 0x01 0x0000
 fcs1 0xF1000A000033D542 0x0008 VIO2 vfchost3 0x01 0x0000
Posted in Sin categoría | Leave a comment

Welcome to my blog!

TIPS-for-AIX blog is intended as a reference guide about AIX Operating System.

The main purpose is to collect concepts, commands, tips and useful tricks to VIOS, PowerHA, HMC, NIM, tuning and system performance.

I hope this site will be you helpful for the daily work of System Administrators.

Your comments and feedbacks are welcome.

Best regards,
Aitor Ródenas

Posted in Sin categoría | Leave a comment